There are only two patterns up right now, but expect more in the future! I've committed myself to a goal of at least one new pattern a month, and when they go live, I'll post here. Later on in the month, be on the look out for both a new pattern for sale on Ravelry and Etsy, and a new free pattern here in this blog!
About: keeping up with a baby and toddler, cute things I like/want/have, knitting and sewing and making, my expanding nail polish collection, food I should probably eat instead of frozen pizza, the art degree I never use, trying to keep from feeling like I live in a toy box, and more...
Showing posts with label knitting pattern. Show all posts
8.04.2010
New Etsy Shop!
Along with featuring my patterns on Ravelry, I've decided to set up an Etsy shop for my patterns!
Labels:
etsy,
knitting,
knitting pattern,
ravelry,
store
6.16.2010
Making mittens and a new camera!
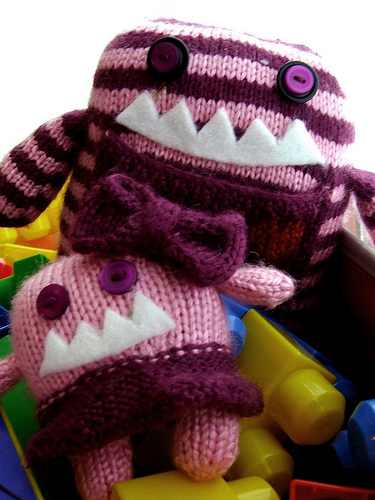
O has figured out how to army crawl, and is now dragging himself around on the floor like a little worm. I need to figure out how to keep the Hot Wheels from the tiny baby! We've been getting outside more with all the nice weather. Chalk is amazing! In the sense that it gets B to stay in one place while I lounge around with little O and try to keep him from eating fistfuls of grass that he rips out of the earth with his tiny pudgy little hands. Today we went to a super fun birthday party for an adorable little girl. Which gave me the opportunity to knit these adorable monsters that I have been wanting to knit forever. I think it's my new favorite knitting pattern. It's well written and easy to follow and so cute. B has insisted I knit him blue ones. And I am more than happy to oblige!
Labels:
camera,
dslr,
knitting,
knitting pattern,
kureyon,
mittens,
monsters,
noro kureyon,
ravelry,
stranded
6.06.2010
Recycled Sari Silk Mittens (or as I like to call them Happy Hippy Mittens)
In my last post, I talked about the recycled sari silk mittens I was working on. I finished them tonight, and figured I'd write up the pattern here. Even though it's a really basic mitten pattern, its nice to have someone else figure out all the math stuff for you. I looked for patterns to use this ball of yarn so I could admire all of its colours and textures, but came up short. Unless I liked drop-stitch scarves (which I don't, all that loose yarn makes me anxious), or had just a bit more yarn to knit a bag (that I probably would not use, so that would be a waste), there just was't much out there. So I decided to use it to knit my favorite thing, mittens!
Mittens are a little bit of an unconventional use for this sort of yarn. It's not really stretchy or particularly soft and fuzzy (although a bit of washing with a gentle conditioner goes a long way!), and some people find it really difficult to work with. Maybe it is the particular brand, (Darn Good Yarn Wild Peacock Recycled Silk), but this stuff knit up really well. And quick! Because it's so chunky they knit up crazy fast, and only took a few hours per mitten. Sure they are not warm fuzzy wool mittens, but think of how much more positive your outlook will be on a cold February morning when you are wearing such colourful and exotic mittens! Like their yarn's namesake, they look like vibrant peacocks strutting their stuff. No one is going to be mistaking these mitts for their Thinsulate flip top mittens. Anyways, on to the pattern.
Happy Hippy Recycled Sari Silk Mittens
Yarn:
Darn Good Yarn Wild Peacock Recycled Silk (or any chunky recycled silk yarn)
The ball is 155 meters (or 170 yards), and I would say each mitten used about a third of it.
Needles:
Size 8 (5.0mm) double-pointed needles
Gauge:
17 rows and 14 stitches in a 4 by 4 inch square
Size:
Finished mitten is 9 inches long and 3 3/4 inches wide, it's on the larger side of medium
Note:
In the shaping of the thumb gusset, when I say M1, I mean make or increase however you feel comfortable, as long as it does not make a hole. I KFB'd (knit into the front and back of one stitch). For more information on increases look here. And here are decreases for good measure.
Pattern:
Cuff:
Cast on 21 stitches and divide equally between 3 needles
Knit 10 rows
This will give you a cuff of about 1 1/2 inches, if you want a larger cuff, just knit a few extra rows.
Shape Thumb Gusset:
K10, M1, K1, M1, K10 (23 stitches on needles)
Knit one row
K10, M1, K3, M1, K10 (25 stitches on needles)
Knit one row
K10, M1, K5, M1, K10 (27 stitches on needles)
Knit one row
K10, M1, K7, M1, K10 (29 stitches on needles)
Knit two rows
K10, put 9 stitches on holder or waste yarn, k10 (20 stitches on needles)
Body:
Right mitten:
M1, K10, M1, K10 (22 stitches on needles)
Left mitten:
K10, M1, K10, M1 (22 stitches on needles)
M1, K10, M1, K10 (22 stitches on needles)
Left mitten:
K10, M1, K10, M1 (22 stitches on needles)
Both mittens:
Knit 17 rows
Knit 17 rows
Top:
K2tog, K7, SKP, K2tog, K7, SKP (18 stitches on needles)
Knit 1 row
K2tog, K5, SKP, K2tog, K5, SKP (14 stitches on needles)
Place 7 stitches on each on two needles and bind off using kitchener stitch
Thumb:
Pick up 9 stitches from waste yarn, as well as one from each side of the inside thumb (11 stitches)
Knit 10 rows. In the first row knit the two picked up stitches together (10 stitches)
K2tog, K1, SKP, K2tog, K1, SKP (6 stitches)Knit 1 row
Place 3 stitches each on 2 needles. Bind off using kitchener stitch
Weave in all ends and gently hand wash with a gentle conditioner to soften. Air dry. Dazzle!
Subscribe to:
Posts (Atom)